Partner Portal Manual
Choose a chapter
- Introduction
- Quick Start
- Settings
- Main Menu
- Level7 Integration Plugin
3. Settings
Agents
Agents can be created to re-sell products and services to earn commission on their sales.
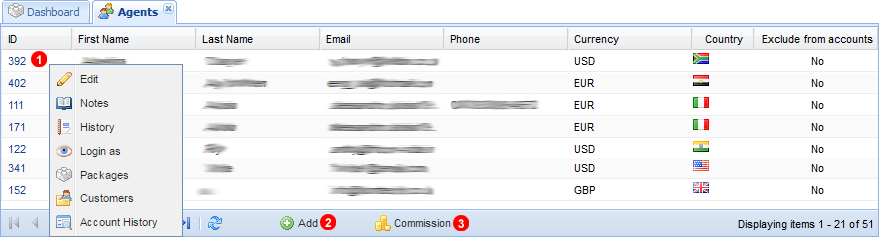
- Click to open Context menu.
- Click to add new agent to system.
- Provides additional information regarding commission earned per agent.
Add Agent
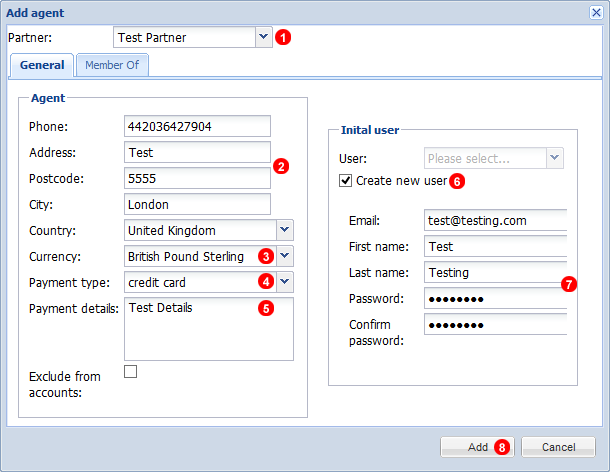
Add Agent:
- Select which Partner the New Agent will be Assigned to.
- Fill in Address and Phone number of Agent.
- Select Currency Agent will earn commission in.
- Select Method Payment will be made to Agent.
- Provide Bank or Card Details.
- If agent is already a customer do not create new user just link with existing account.
- Fill in all information required for authentication.
- Click Add to Finalize.
Commission
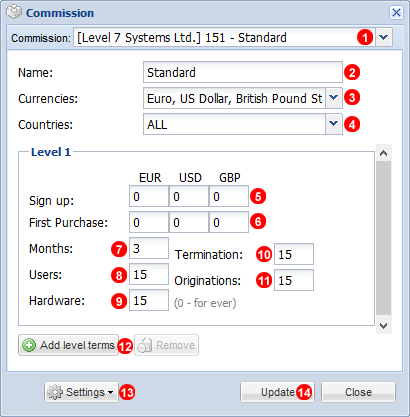
Commission:
- Select Commission List.
- Name List.
- Select Currencies applicable.
- Select Countries commission can be earned for.
- Select commission paid when customer signs up.
- Select commission paid when customer makes first purchase.
- Time period commission will be paid out for.
- Percentage Commission paid for User accounts.
- Percentage Commission paid for Hardware Purchases
- Percentage Commission paid for Terminated Calls.
- Percentage Commission paid for Originated Calls.
- Click to add additional levels of Commission.
- Click settings to add new Commission list and assign to Agents.
- Click Update to save settings.
Blacklists
Provides the capability of completely blocking, possibly fraudulent or abusive numbers, email domains or ISP`s to ensure network and customer stability.
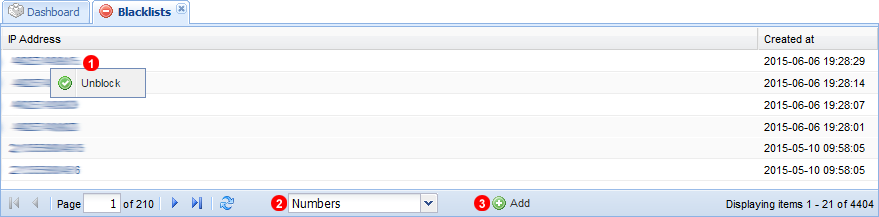
- Click to unblock number or IP.
- Filter blacklist methods.
- Click to add new number or IP to Blacklist.
CDR Providers
Commission
Provides a summary of commission earned by each agent.

- Click to view earned commission in more detail.
- Download the invoice for commission earned in PDF format.
- Filter Partners or Agents.
- Export all filtered data to XML file.
DDI Gateways
In order to receive incoming calls a DDI Gateway has to be set up first.
3 Gateway or Provider Types available:
- API Provider: All Numbers and Coverage available automatically via API updates.
- Custom: DDI Coverage has to be uploaded Manually.
- Stock: DDI Coverage and exact available number stock has to be uploaded manually.
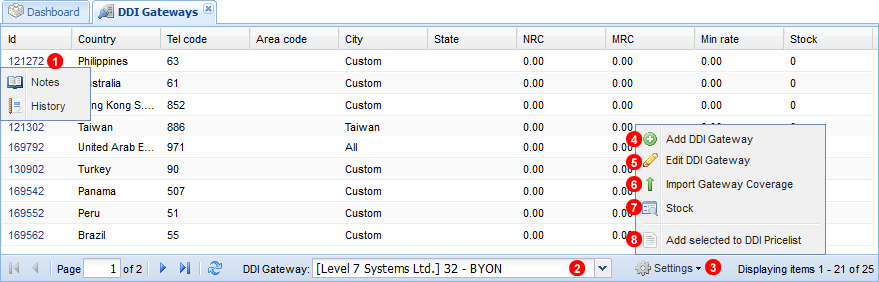
- Click to view notes and change history.
- Filter different DDI Providers or Products.
- Click Settings to open menu to add, edit and import Gateways.
- Click to add new DDI Gateway.
- Click to Edit Currently selected Gateway.
- Click to Import Gateway Coverage if Custom or Stock Gateway is used for API gateways the option will be replaced with load coverage with API.
- Stock option will only be available if Gateway type is Stock and allows the upload of available numbers from provider.
Add & Edit DDI Gateway
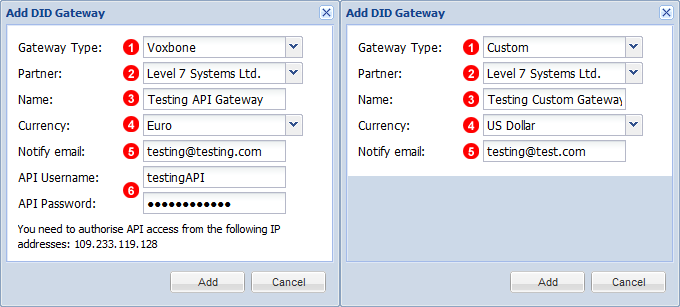
- Select Gateway Type either API or Manual. API gateways only applicable if an account is held wil Magrathea or Voxbone.
- Select Partner DDI Gateway if applicable.
- Provide Descriptive Name for new Gateway.
- Select Gateway Currency used by DDI provider.
- Provide e-mail address for all alerts and Notifications of Gateway Status.
If API Gateway is Selected: 6. Provide API Username and Password obtained from DDI Provider.
Uploading DDI Coverage
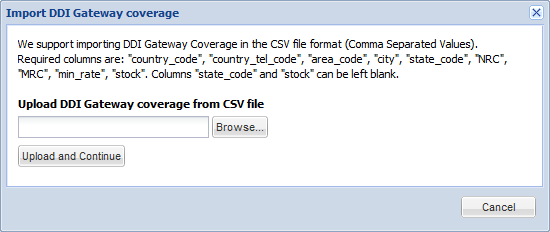
Upload CSV File from DDI provider to populate the system and apply to DDI Pricing. This step is required for a Stock or Custom DDI Gateway.
Example CSV file found here:
Uploading DDI Stock Coverage
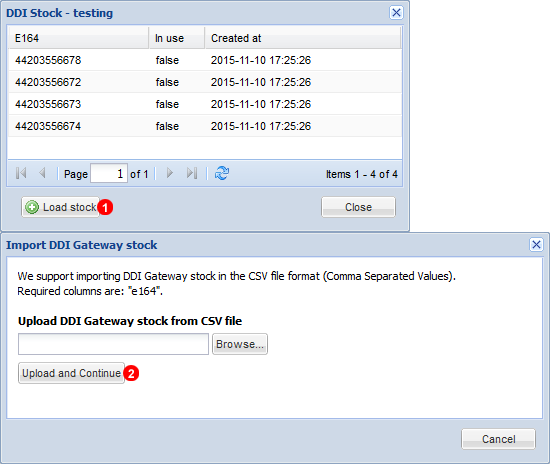
Click load stock to Open the upload window to import all numbers from DDI Provider. This step is only required for Stock DDI Gateway.
Browse and upload CSV file of available numbers from DDI Provider.
Example CSV file found here:
Add DDI Coverage to DDI Pricelist
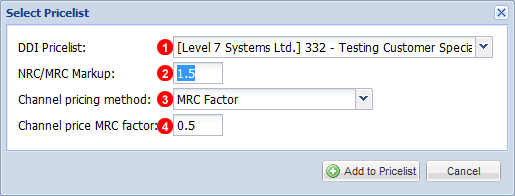
- Select DDI Price-list that current Gateway Coverage will be applied to.
- Select Mark-up on NRC(Non Recurring Cost) and MRC(Monthly Recurring Cost). In above example 1.5 = 50% Mark-up. Additional Example: 1.25 = 20% Mark-up.
- Select either MRC Factor or Fixed Cost for each additional Inbound Channel on DDI`s
- Select Cost of each additional channel as a percentage of the MRC in above example 0.5 = 50% of Monthly Recurring Cost. If fixed cost is selected enter set amounts for each currency as desired.
NOTE: If only parts of the Coverage needs to be uploaded to Price list a Filter HAS to be applied to make it the selected.
DDI Pricelist
DDI Price-lists set the pricing customers will pay for specific DDI`s and are required for customers to receive calls.
Also stipulates which numbers are included on the Unlimited Plans.
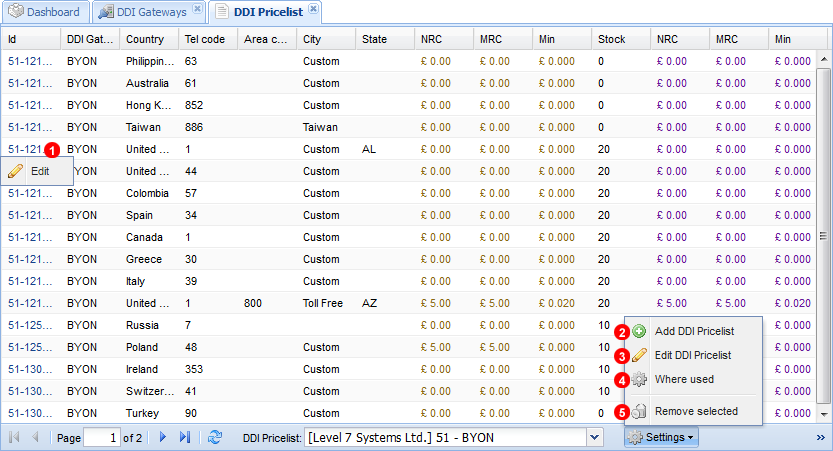
- Click to Edit single DDI Pricing.
- Click to add new Price-list.
- Click to Edit Current Price-list.
- Where used provides all customers and web products list is applied to and new Items can be added.
- Removes the Selected Price-list.
Add & Edit DDI Pricelist
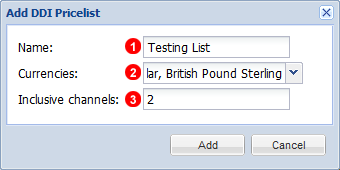
- Name DDI Price List.
- Select Applicable currencies.
- Select how many inclusive incoming channels will be provided.
Help
Partners
Partners are White Label re-sellers and generate additional commission from sales.
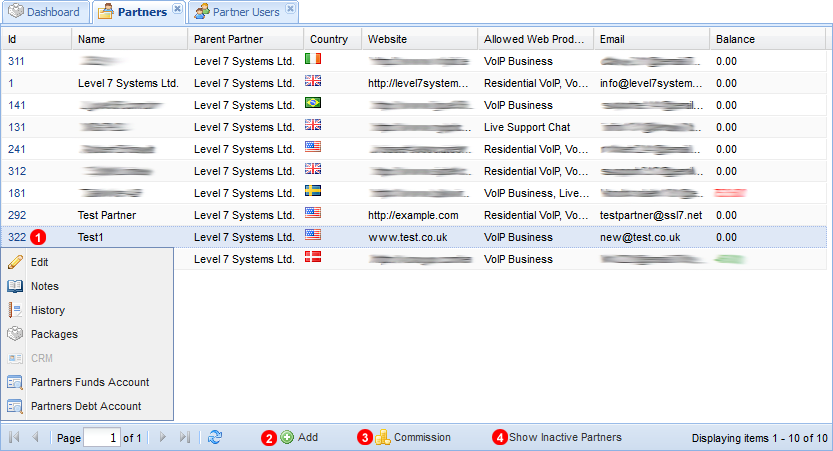
Partners Panel:
- Click to Edit selected Partner.
- Click to add new Partners to system.
- Select commission structure of selected Partner.
- Show or Hide any inactive partners.
Add Partner Window
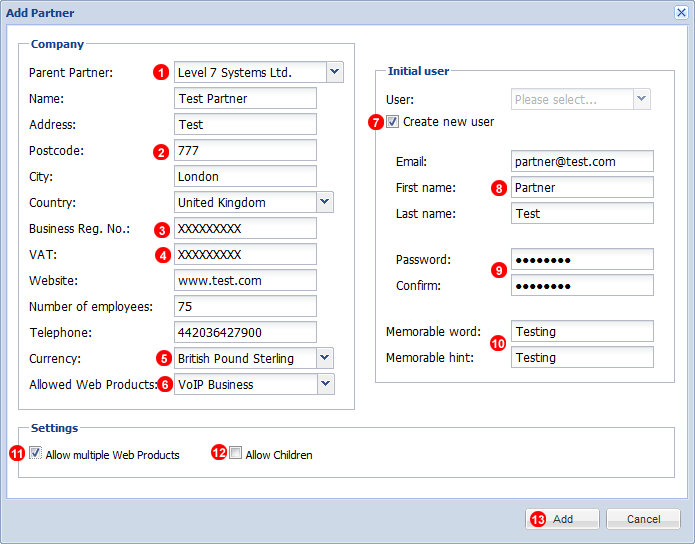
Add Partner Window:
- Select Parent Company associated with partner.
- Enter Company Name and Address information.
- Enter Business Registration Number.
- Enter VAT number. Please note that for all EU countries a VAT number is Mandatory.
- Select currency Parent Company will invoice Partner.
- Select Products Partner will have available.
- Select new User if partner does not currently have any accounts on the system.
- Fill In user details.
- Select Password for User.
- Select Memorable word used at login.
- Select whether partner is allowed multiple Web Products.
- Select whether partner is allowed to recruit secondary partners.
Edit Partner Window
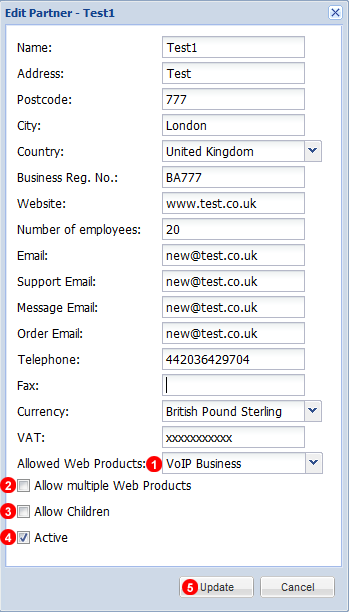
Edit Partner:
All contact and personal details can be edited after partner has been added.
- Select new or remove allowed Web Products.
- Enable or disable Multiple Web Products.
- Enable or disable Subsequent Partners.
- Activate or Disable Partner.
- Update to save all settings.
Partner Commission
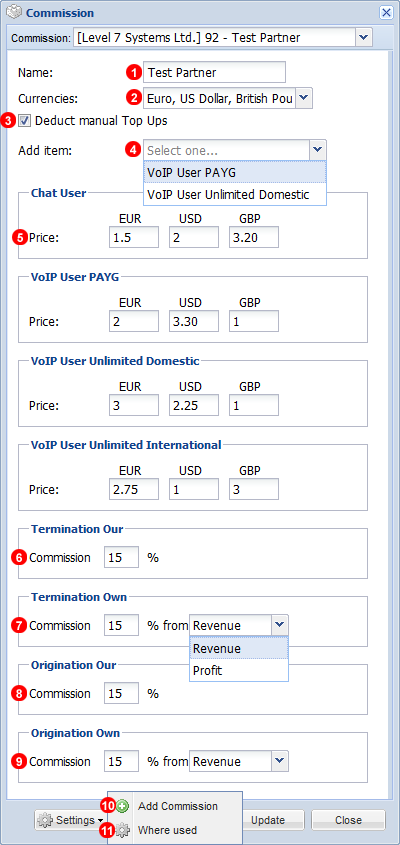
Partner Commission:
- Name for Commission Structure.
- Select Currencies used by Applicable Partners.
- Select to deduct all manual credit top ups from commission.
- Select Payment Packages Commission will be applied to.
- Select Commission charges according to currency.
- If Partner is using Parent Company termination select % of Commission paid to Partner.
- If Partner is using own Termination select 15% Commission taken from Partner Revenue or Profit.
- If Partner is using Parent Company DDI Gateway select % of Commission paid to Partner.
- If Partner is using own DDI Gateway select 15% Commission taken from Partner Revenue or Profit.
- Click to add new Commission structure.
- Click to see where Commission structure is assigned, for example a partner or partner web product.
Partner Users
Manage the Users for White Label Partners.
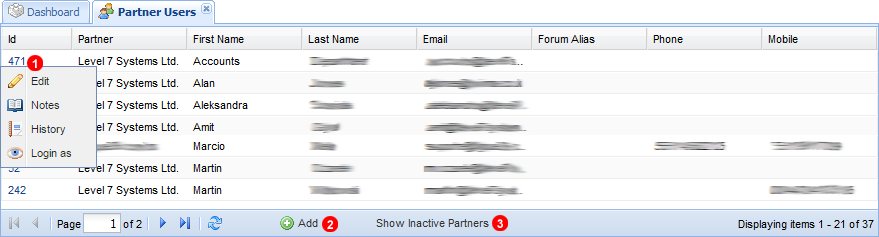
- Click to edit User.
- Click to add new Partner User.
- Select to show inactive Users.
Edit Partner User
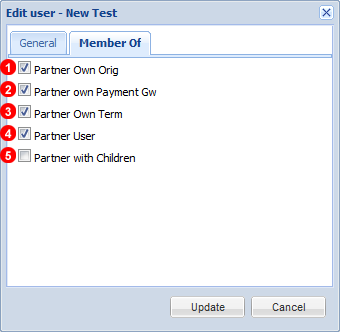
Edit Partner user:
- Select if Partner will be using own DDI Provider.
- Select if Partner will be using own payment gateway.
- Select if Partner will be using own Termination provider.
- Select if Partner will require multiple partner users.
- Select if Partner allowed to have subsequent partners of their own.
Phones
Displays all Phones with Pricing and Specifications available to customers for purchase and will display on website.
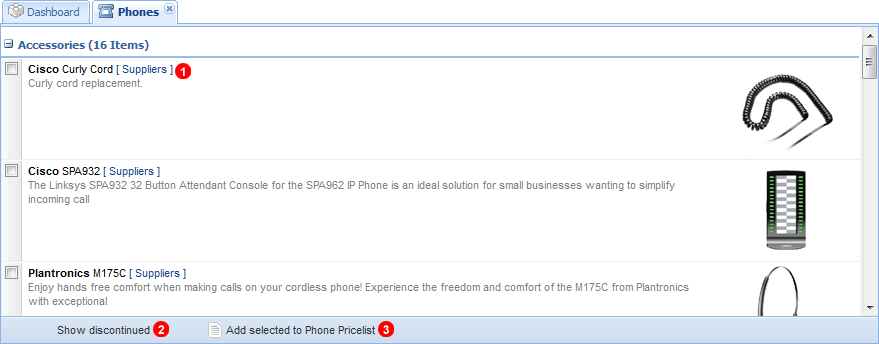
- Select to display current phone suppliers.
- Select to display discontinued devices.
- Add device to pricelist.
Phone Pricelist
Edit, add and manage pricing of Phones and hardware provided for customers.
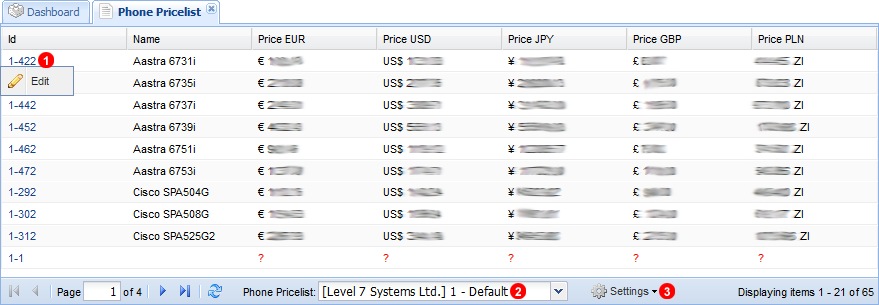
- Click to edit pricing.
- Filter different Products.
- Click settings to add new pricing.
Add & Edit Phone Pricelist
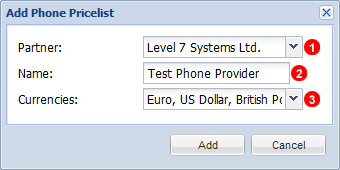
- Select Partner new List applies to.
- Provide name of new Phone Provider.
- Select all applicable currencies.
Payment Gateways
Before customers can make any payments for services a payment gateway is required this can be Payment Providers provided by Parent company or any chosen provider.
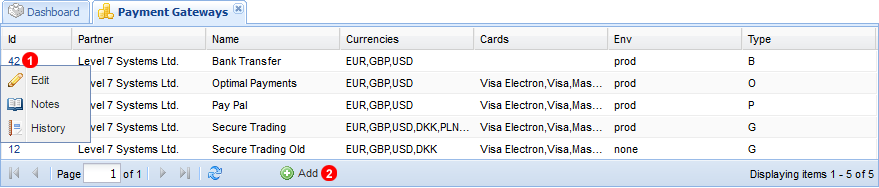
- Click to edit Payment Gateway.
- Click to add new Payment Gateway.
Add & Edit Payment Gateway
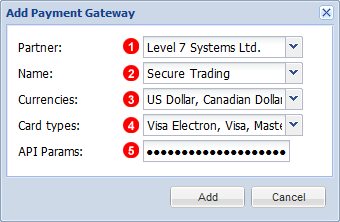
- Select Partner Gateway will be assigned to.
- Select Payment Provider.
- Select all acceptable Currencies.
- Select all acceptable card types.
- Provide API used to communicate with payment provider.
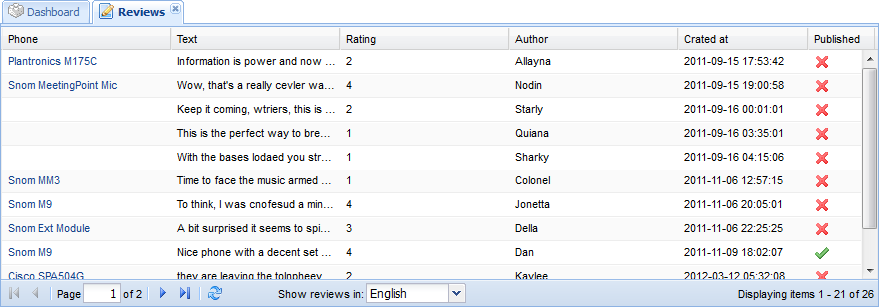
Reviews
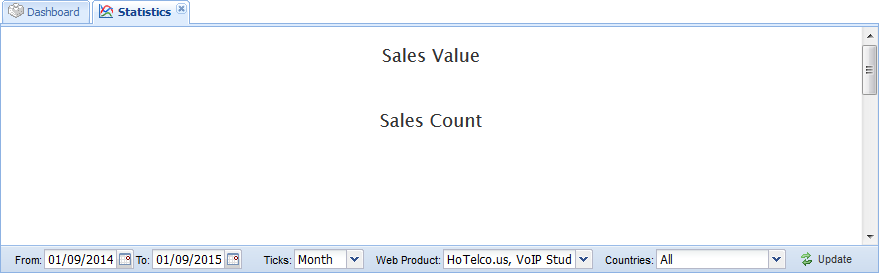
Statistics
System Emails
Can add or manage any emails sent out by the system Automatically for example when a customer creates a new support ticket a notification is sent out with details of the support ticket.
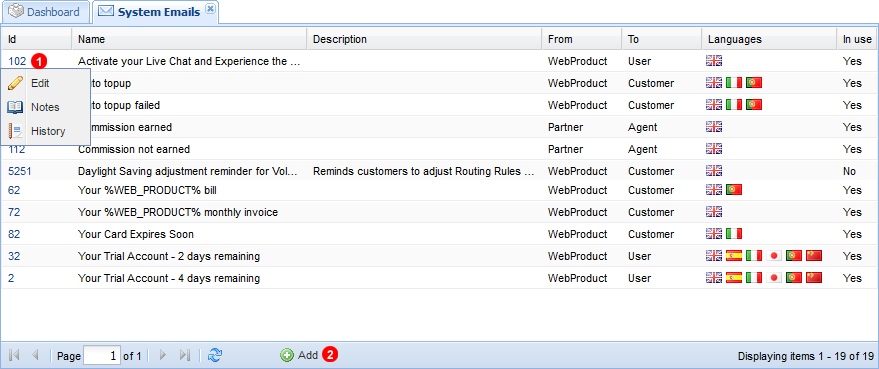
- Click to edit email system sends out.
- Add new Automatic email sent out.
Term Gateways
Before any outgoing calls can be made a termination gateway has to be in place with the Termination Provider along with Termination Pricing.
NOTE: The following IP`s will need to be allowed by the Terminating Carrier: 82.113.147.229 and 97.107.141.97

- Click to view history and notes.
- Select to Filter Product.
- Click to add, Edit and Import new Gateways.
Add and Edit Term Gateways
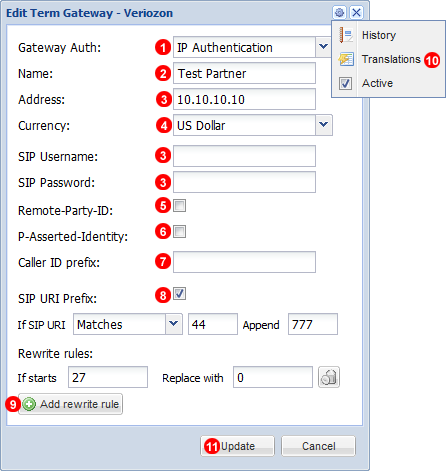
Add or Edit Termination Gateway:
- Select Method of Authentication IP or SIP Credentials.
- Provide Descriptive Name.
- Input Provider IP or SIP Username and Password if SIP Credentials are selected.
- Select Provider Preferred Currency.
- Select if Provider Required Remote-Party-ID.
- Select if P-Asserted-Identity is required by Provider.
- Input Caller ID Prefix if required.
- If additional Prefix is required select SIP URI Prefix.
- Add Rewrite Rules to change Digit String as required by Provider.
- Select Translation as to Simplify Uploading or Updating Rate Sheets.
- Click Update to create new Gateway or Update existing.
Rewrite Rules
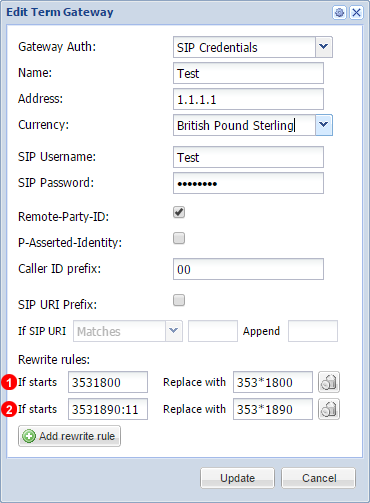
Rewrite Rules match and then replace digits in outgoing calls.
This is mainly used in special number cases.
- Any Numbers starting with 3531800 will have those digits stripped and replaced with 353*1800
- Any Numbers Starting with 3531890 and is Longer than 11 Digits will be replaced with 353*1890.
Any number equal or shorter than 11 Digits will be passed without modification.
Translations
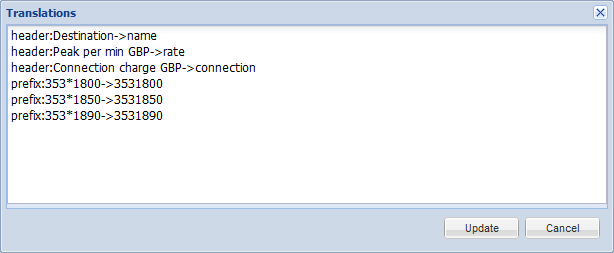
Translations:
Using Translations simplify the Import of CSV files when updating rates and codes from Providers by changing Headers and Prefix to a format accepted by the system.
We support importing Termination Gateway Coverage in the CSV file format (Comma Separated Values). Required columns are: "prefix", "name", "rate", "connection".
In Below example the "header:" in row 1 is changed from "Destination" to "Name" and the Prefix matching 353*1800 is changed to 3531800
Term Pricelist
Provides the management and addition of Termination pricing. Values entered will be used to calculate the cost of outgoing calls for Customers.
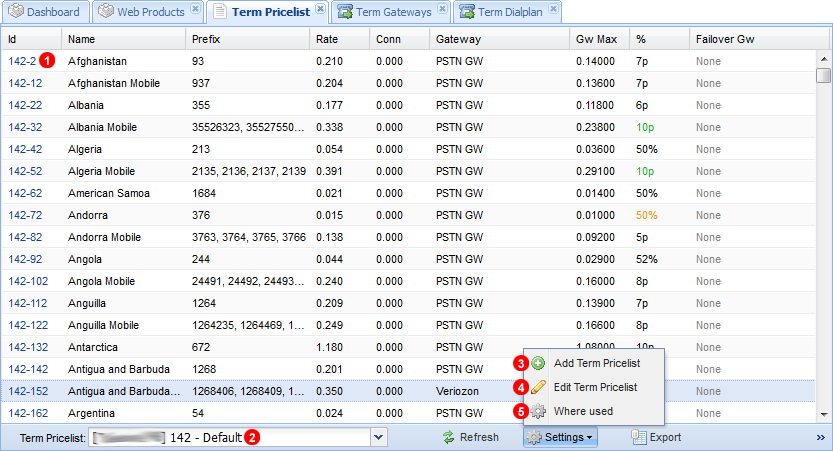
- Click to edit pricing.
- Click Settings to add and edit pricelists.
- Export filtered pricelists.
- Display Lowest routing cost.
- Click Total to display all Regions not included in Price Plan.
Edit Destination
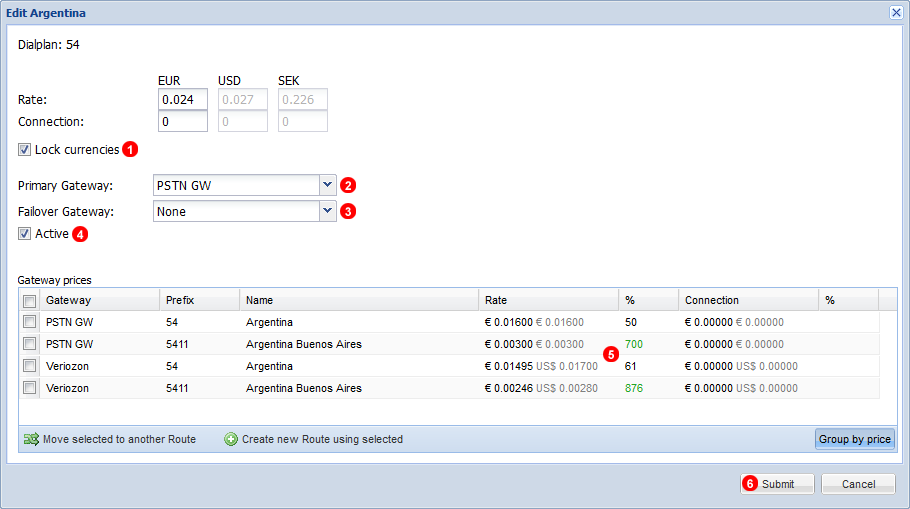
Edit Single Destination:
- Select to Lock or Unlock Currencies as to manually change pricing without affecting pricing under other currencies.
- Select Primary Termination GW or Provider.
- Select Fail-over Provider.
- Select whether fail-over is active or not.
- Compare Pricing and Profitability.
- Click to Submit and save.
Add Term Pricelist
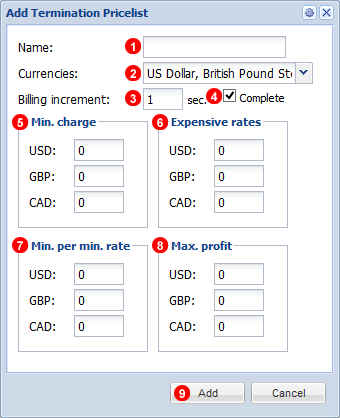
Add or Edit Termination Pricelist:
- Input Descriptive Name.
- Select Applicable Currencies.
- Select billing increment in Seconds. For Example per second or per minute.
- When selected (default) all Routes from Termination Dialplan will be included in the pricelist. If deselected, the pricelist may consist only of some (few selected)destinations which will overwrite default pricing on customer by customer basis.
- Select Minimum charge for calls. To avoid unnecessary fractions and increasingly small charges.
- Select Rates considered expensive. For use in blocking Fraudulent or Abusive calls.
- Minimum Charge for calls of one Minute. Useful to regulate charges on very low yield routes.
- Maximum Profit per Minute. To avoid exceptionally high charges for high yield routes.
- Click Update to Save or update Price list.
Watchdog
Monitors all systems and provides details of any errors experienced when accessing different systems.
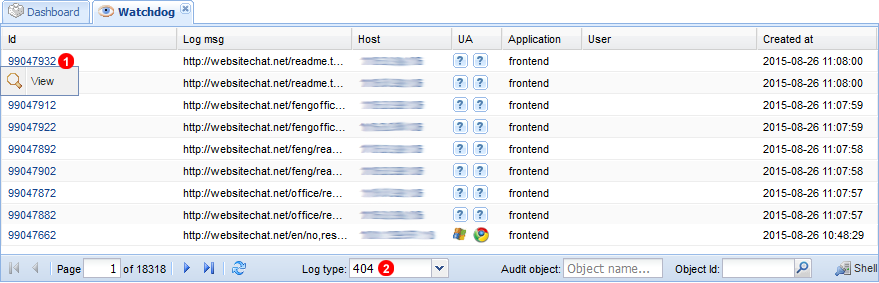
- Click to view entry.
- Filter different log types.
Web Products
Manage and create new Products or White label Products this ranges from Cloud PBX to Live Support Products.
Also define any commission required from White Label Partners.
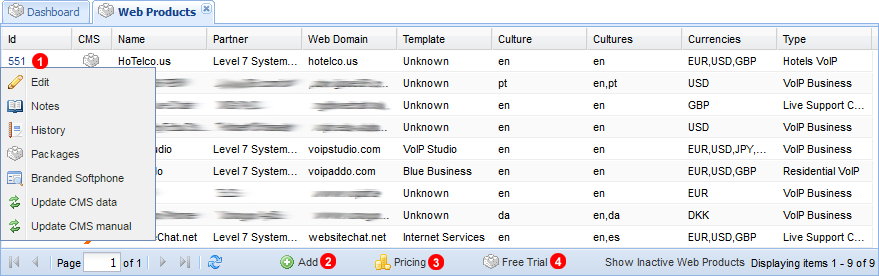
- Click to edit and view web products.
- Add new Web products.
- Edit Pricing.
- Edit parameters of Free trial.
Pricing
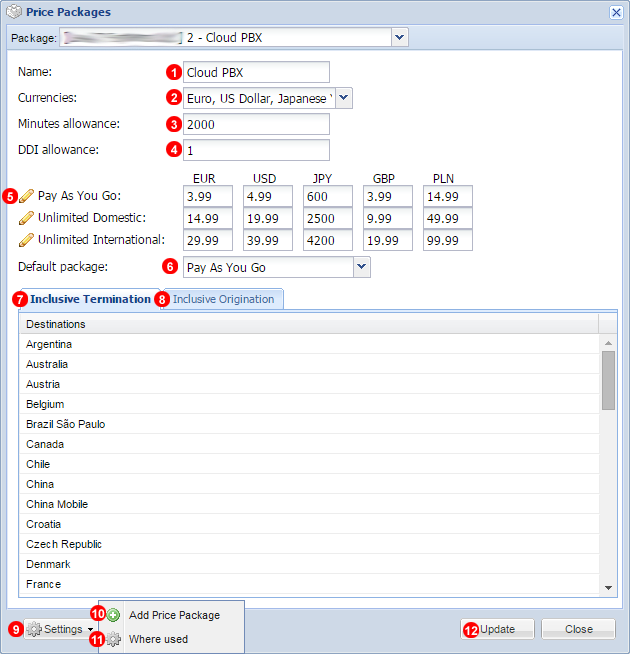
Price Packages:
- Provide Naming for New Price Package
- Select Applicable Currencies.
- Decide maximum minutes allowed on unlimited Plans per user per month.
- Decide Maximum number of Inclusive DDI`s per user.
- Select Pricing according to selected currencies for each plan. Click Edit Button(Pencil) to change the naming convention for each plan. NOTE: Any Pricing Plan set to 0 will disable the plan entirely.
- Select Default Package Selected when signing up for trial or for full account when option to select is not provided.
- Drag and Drop Destinations included in Minutes Allowance from Termination Price-list.
- Select DDI Gateway for DDI Allowance.
- Select Setting for Additional Options.
- Click to add new Price Package
- See to what other Items currently selected Package is connected.
- Click update to save selected settings.
Price Package Where Used
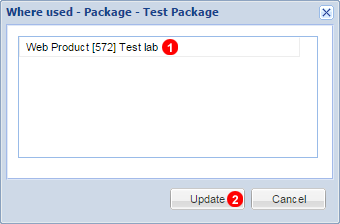
- Drag and drop Web Product, Customer, Agent or Partner to link with created Price Package.
- Click update to save newly created link.
Trial Package
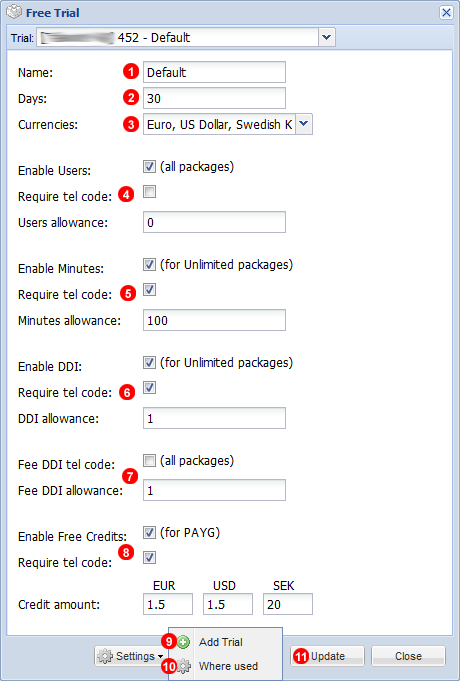
Trial Account:
- Provide Descriptive Name.
- Select length of Trial in Days.
Select Applicable Currencies.
Select if Additional users can be added on Trial. Select if Activation code is required to add additional users. Select Maximum amount of users that can be added on trial (0 means unlimited)
Select if Minutes Allowance is supplied with Trial Select if Activation code is required for Minutes Allowance. Select amount of Minutes Allowance.
Select if DDI Allowance is supplied with Trial. Select if Activation code is required for DDI Allowance. Select Number of DDI`s included.
Select if Free DDI
s are included in Trial.
Select number for Free DDI
s that can be utilized during trial.Select if Free Credits are supplied for PAYG. Select if Activation code is required for Free Credits. Select value of free credits according to selected currencies.
Click to add additional Trial Packages.
Click to see where current Trial Package is being used.
Click to Update with selected Settings.