Partner Portal Manual
Choose a chapter
- Introduction
- Quick Start
- Settings
- Main Menu
- Level7 Integration Plugin
4. Main Menu
Basket
Displays all items in the basket of selected customer.
Provides pricing and when payment is due. Items not due will display as hidden thus not visible in customer basket until payment date.
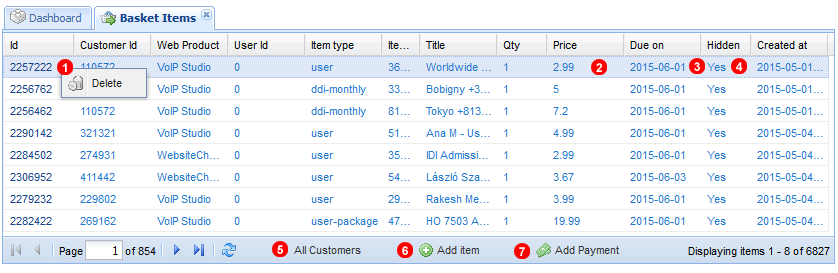
- Click on required ID to open Delete Option to remove entry from Basket.
- Displays Pricing of Item.
- Displays Date Payment for Item.
- Displays whether Item is hidden untill payment date.
- Displays items for Blocked or Suspended Cusotmers.
- Click to open dialog window to add Custom or Non Standard Item.
- Click to open dialog window to add payment for Customer or Non Standard Item.
Adding items
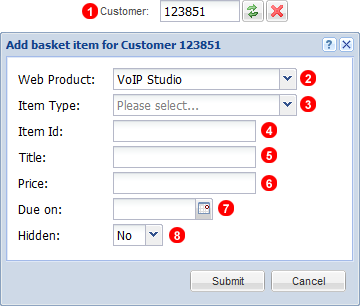
- Select Cusotomer for Intended Item.
- Select Product for Intended Item.
- Select Item Type.
- Input Unique Item ID.
- Provide Brief Description of Item.
- Input Intended Pricing for Item.
- Select Date Payment is due on.
- Select whether Item is hidden until Payment Date.
Adding Payments
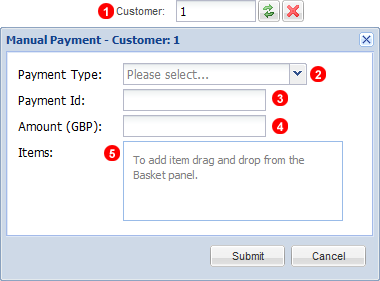
- Select Customer for Intended Item.
- Select Payment Type.
- Input Unique Payment ID.
- Input desired Cost of Payment.
- Drag and Drop Item from Basket Panel to connect to Payment.
CDR
Displays all CDR`s or can filter according to specific customer.
Can change tabs to view Dialled, Received, Missed or Other.
Also provides CDR trace capability.
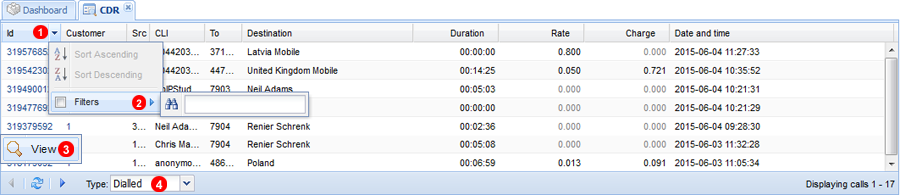
- Click on Arrow Next to Colum Header Name.
- Input Data to Filter by.
- Select CDR Record to View Additional Information for troubleshooting.
- Select type of calls to filter.
CDR Info Menu
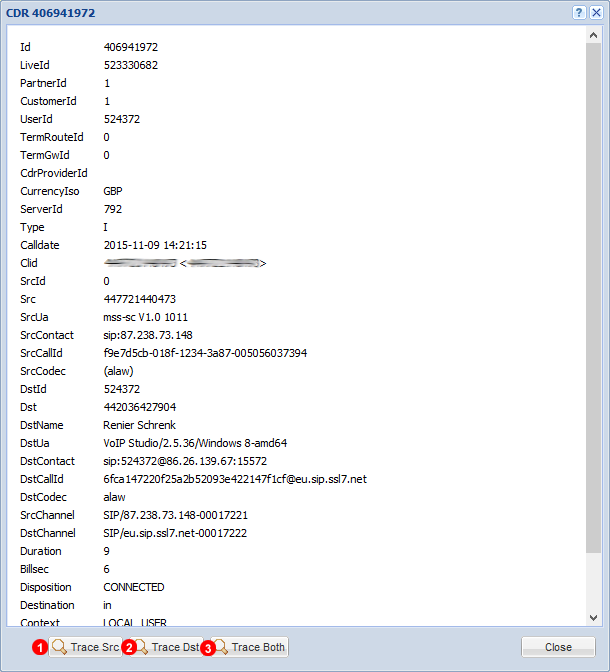
The CDR Information Menu provides valuable call statistics for troubleshooting in the form of a SIP Trace.
- Click to see trace of only source packets.
- Click to see trace of only destination packets.
- Click to see trace of both south and destination Packets.
Chats
Displays all webchat chats of customers.
All chats are encrypted to ensure customer privacy.
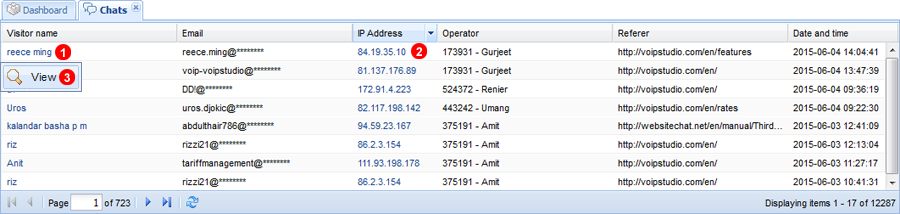
All Live Chat details are displayed and can be sorted and filtered.
- Click to open contextual menu.
- Click to do "Who is?" search or block IP.
- Click view to see Chat Information Menu.
Chat Info Menu
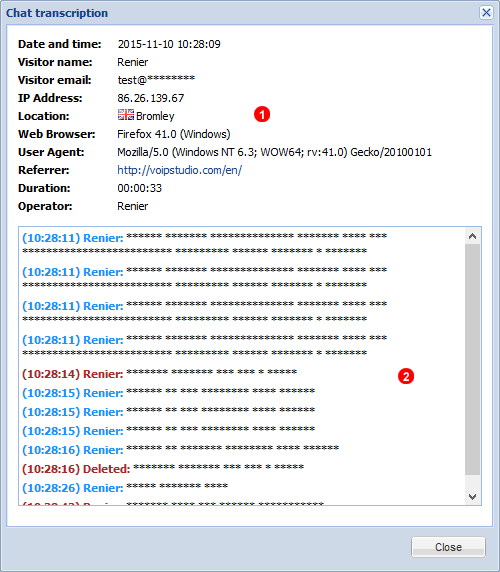
- Provides Meta Data of customer initiating the chat.
- Encrypts chat data for customer privacy.
Conferences
Displays all Conference Room details for Selected Customer.
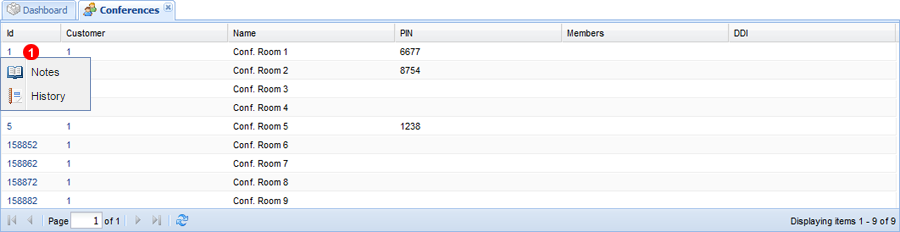
- Click to View History or make a Note.
Credit Cards
Displays Encrypted Credit Card details of customers and current status.
If Displayed Red Card has expired, details can also be deleted if needed.

Displays Encrypted Credit Card Details of selected Customer.
- Click to View History or make a Note.
Customers
Allows the management and creation of new customer accounts.
Can access and edit current credit left for customer along with available minutes for Unlimited Plans.
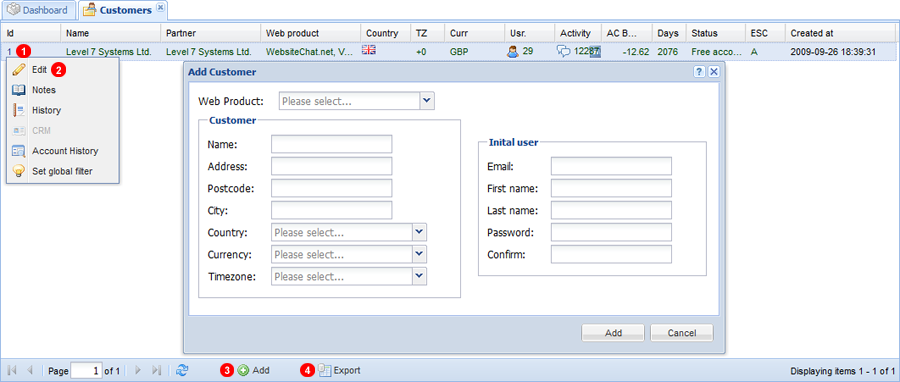
- Click on Customer ID to Open context Menu.
- Click edit to edit customer details.
- Click add to add a new customer.
- Click Export Button to export all filtered customers into XML document.
Edit Customer Menu

- Customer Billing Address.
- Currency Customer Will be billed in.
- All EU countries will require a valid VAT Number.
- Special Menu Item that can be dragged into Where used boxes for customer Price lists.
- Details of Account status, trial duration remaining and Price Plan.
- Miscellaneous account details related to billing and remaining credit.
- Click to check for any billing errors on customer account and fix.
- Click to reset the introduction tour that provides basic information on first log in.
- Provides details on the XMPP status of the account.
Customer Phones
Manage and add Phones for customers used with Auto provisioning.

Displays all current registered endpoints of selected customer including Max address of device and user assigned.
- Click to Edit Phone, View History or Make a Note.
- Click to add a Phone to selected customer account.
Add Customer Phone
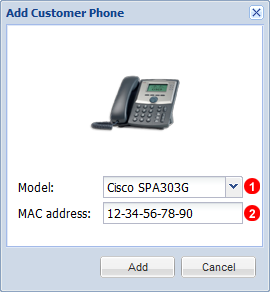
When a customer orders a Phone that can be Auto configured adding the Phone to the Account streamlines the setup process.
- Select Phone Make and Model.
- Add Phone MAC address and click add.
DDIs
Manage and add DDI`s assigned to customers.
Allows adding special numbers for customers and setting pricing and whether inclusive with Unlimited Plans.
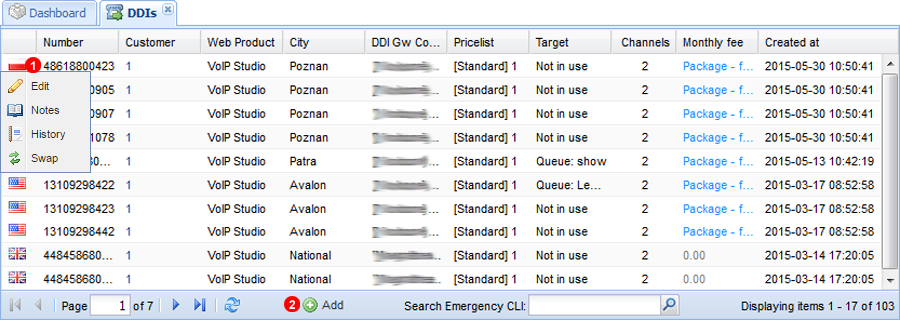
Displays all DDI`s currently held by selected Customer.
- Click Flag to Edit, Swap, View History or Make a Note on DDI
- Click to add DDI to selected Customer account.
Add DDI to Customer
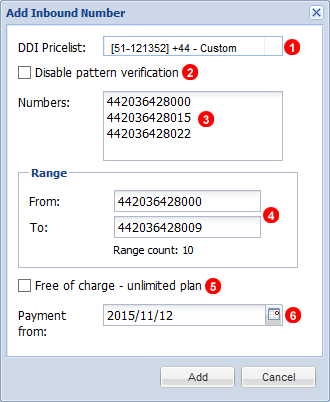
NOTE: DDI can only be added once a customer has been set as default filter. Make sure correct Customer is selected prior to adding a new Number.
- Drag and Drop matching Pricing from DDI Pricelist in Settings into field to assign correct Pricing.
- Select to disable Pattern Verification for numbers that do not match match conventional pricing.
- Enter numbers into Numbers field in E.164 format.
- If a range of numbers need to be added specify first and last number in range.
- Select if Customer is Using any Unlimited Plans or in special case.
- Select when billing for new Numbers will commence until specified date numbers will function normally but will be free of charge to customer.
IVRs
Displays all Customer IVR`s can apply notes or view change history.

Displays All IVR`s currently configured on selected Customer.
- Click to View History or Make a Note.
Monitor
Displays all customer recordings, cannot be accessed or downloaded to protect customer privacy.
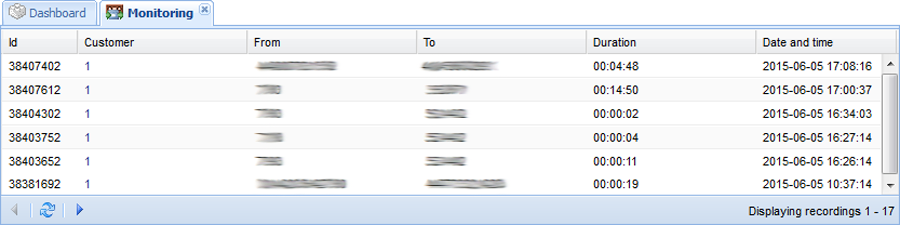
Displays all monitored calls of Selected Cusotmer.
Live
Provides information on live calls so assist with troubleshooting.

Displayes all active calls on selected Customer.
- Click to View additional information about Live Call.
- Click to refresh and receive new call data.
Location
Displays all dial locations used by customer.
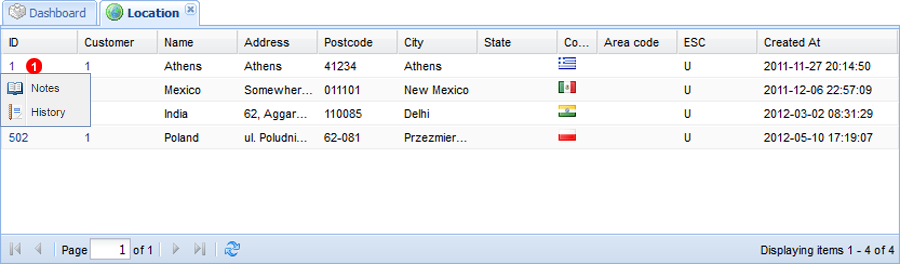
Displays all locations currently configured for selected Customer.
- Click to View History or Make a Note.
Payments
Display`s all payments made by customers with breakdown of Pricing and information if payment failed.
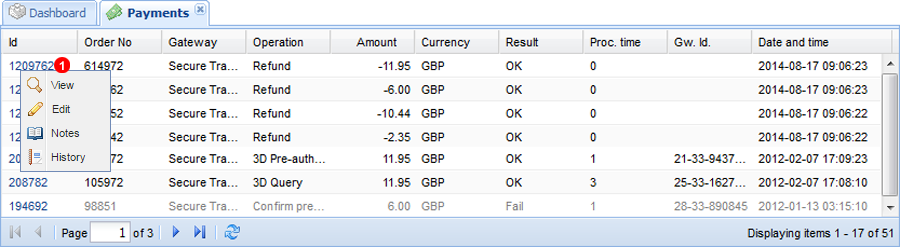
Displays all payments made by currently selected Customer.
- Click to Edit, View, View History and Make a note.
NOTE: Editing the Payment is most useful for Bank Transfers if a clerical error is encountered. This is less likely to happen with Credit Card Payments.
Pending DDI
Pick up groups
Displays all Pickup groups for customers allows making notes and view change history.
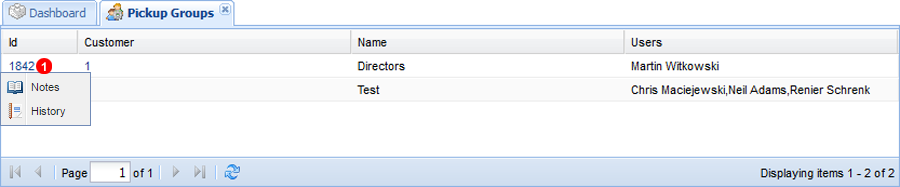
Displays all Pick up groups for selected Customer.
- Click to View History or Make a Note.
Registrations
View all new registrations for trial accounts. Provides meta data about all registrations.
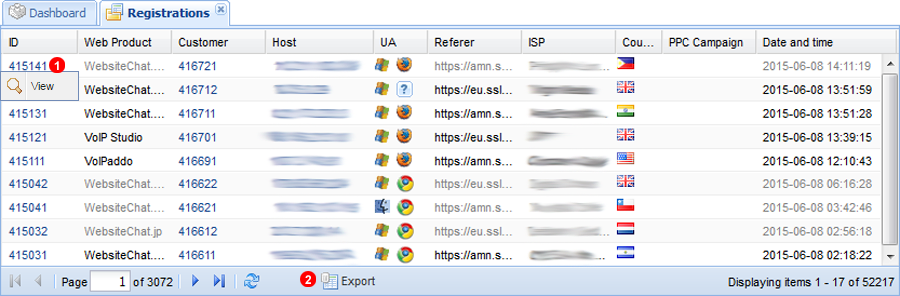
Displays Customer registrations and referer of said registration.
- Click to View Details of Registrations.
- Click to Export Registrations Details.
Ring Groups
View all customer Ring groups allows making notes and viewing change history.
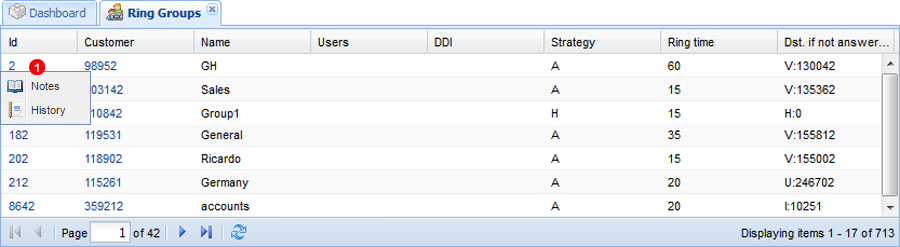
Displays all Configured Ring Groups.
- Click to View History or Make a Note.
Routing Rules
Shows all customer routing rules to assist in troubleshooting and investigation.
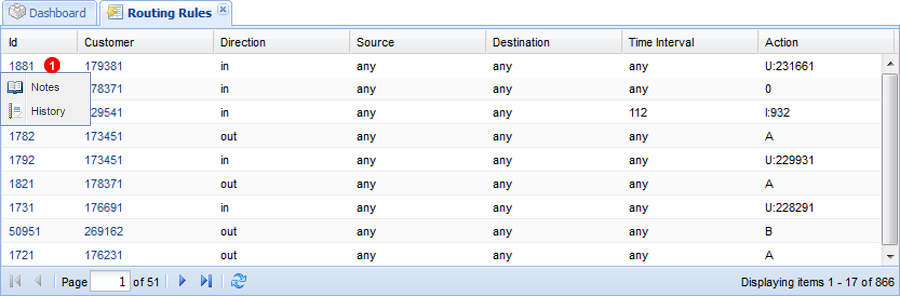
Displayes all Configured Routing rules.
- Click to View History or Make a Note.
Sessions
Shows all currently logged in customers and sessions browsing web page.
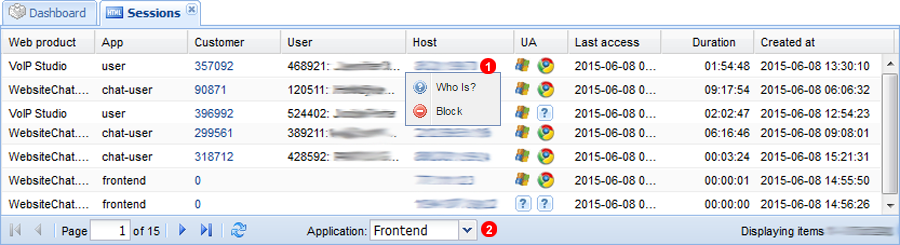
Displays all logged in sessions and sessions visiting Webpages.
- Click IP to do "Who Is?" lookup.
- Select between Frontend and Partners.
SIP Locations
View all registered endpoints on the system or filter to view only specific customer also allows the removal and investigation of problematic registrations.
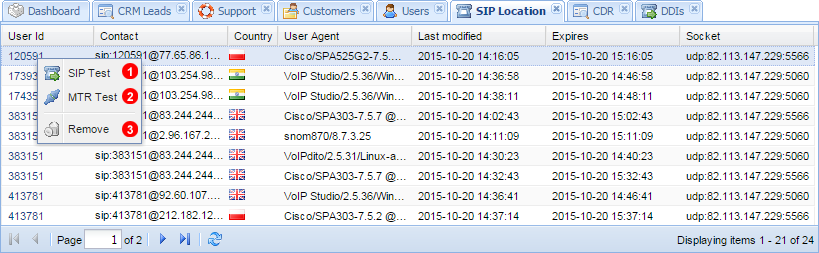
Displays Current Registered Endpoints for all customers or selected customer.
- SIP Test - this test helps to understand if your SIP endpoints have registered properly and is reachable by Partner Portal servers. Extensions will not be able to receive incoming calls if this test fails.
- MTR Test - test uses MTR Tool - http://en.wikipedia.org/wiki/MTR_%28software%29 - to asses quality of network connection between SIP endpoint and Partner Portal servers.
- Allows the removal of a registered SIP endpoint. Please note this feature is designed for Support and Development and any endpoint removed will be unable to receive incoming calls until the device re-registers.
Sounds
Allows adding, editing and listening to customer Audio files used in IVR, Music on hold or Queue systems.
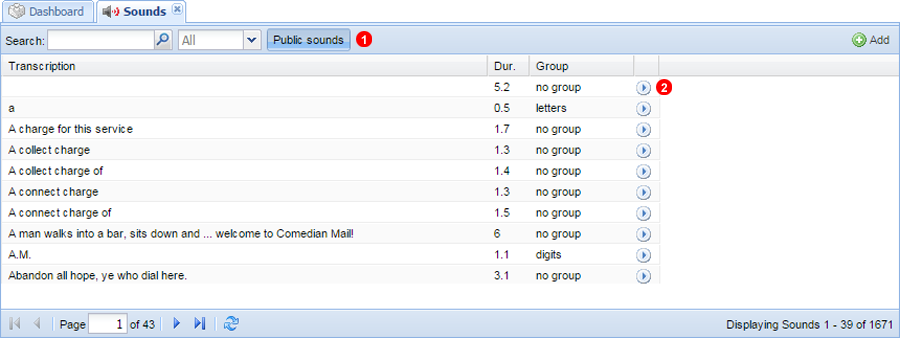
Displays all Sounds loaded onto system.
- Use Tools to Filter results for specific sound.
- Click play button to listen to specific sound.
Add Sounds
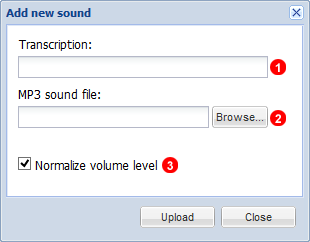
- Provide Descriptive naming for new Audio file.
- Click browse to add and upload Audio file. NOTE: Format Required is MP3 and Size is 2MB.
- Select to allow system to modify Audio levels in order to provide high or low enough volume.
Statements
Displays additions and deductions from Customer PSTN Credit as calls are made or Credit loaded onto account.
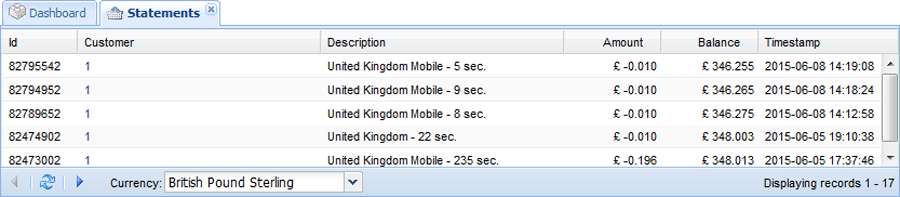
Displays all Current Statements.
Subscribers
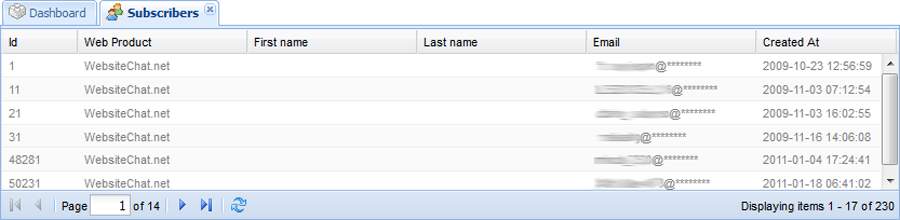
Displays all current Subcribers.
Support
Displays all current Open Support Tickets and allows the management and support of customers.
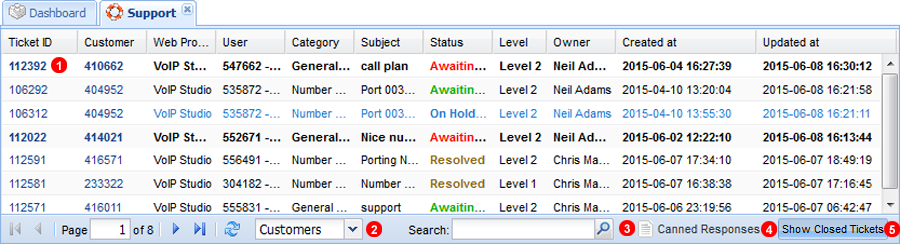
- Click to View Ticket.
- Filter according to Customer, Agent or Partner.
- Search for Tickets using Keywords.
- Click to edit Canned responses.
- Click to show all previously closed tickets.
Transactions
View all customer transactions, also allows for applying refunds or to investigate any errors with payments.
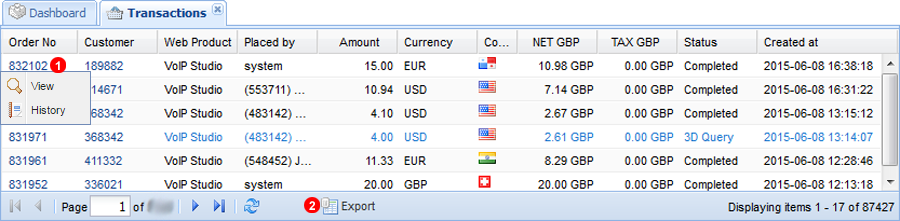
Displays status of all recent transactions.
- Click to view More detail on Transaction or to view history.
- Click to export Transactions Data.
Transactions Menu
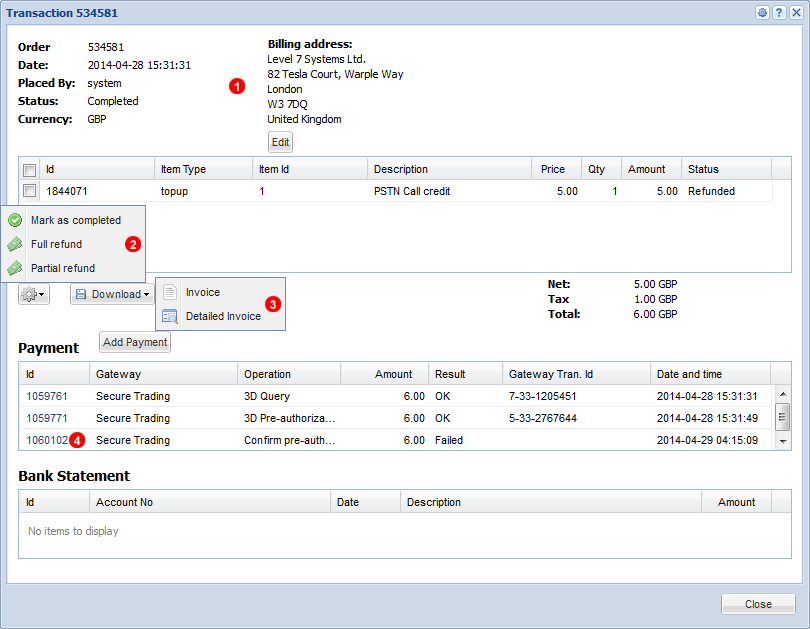
- Basic Billing Information Provided along with ability to Edit Billing Address.
- Options for Customer Refunds available, either full or Partial Refund if multiple items were involved in payment.
- Download Invoice or Detailed Invoice for transaction.
- Click to see additional information about payment, for instance in case of failed transaction the reason for failure.
Transaction items
Displays all Items connected to a transaction.

- Click to view History or Make a Note.
Users
Manage all or selected customer Users, allow allows logging in as specific user to do troubleshooting.
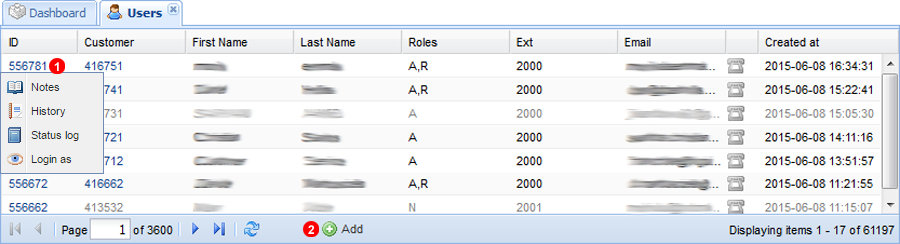
Displays all Users.
- Click to Edit, Make a Note, View History, Status Log or Log in as User.
- Click to add new user to selected Customer.
Add Users
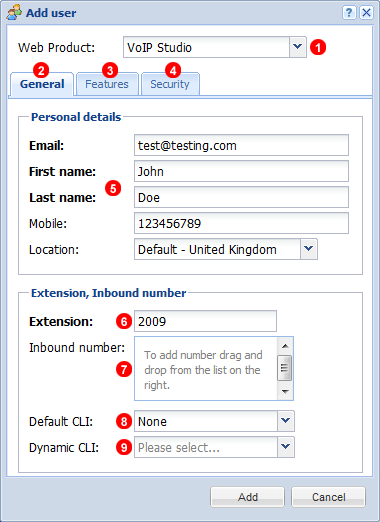
- Select Product User will be using.
- General Tab Provides initial set-up configuration.
- Features select what features user will have available once created.
- To set log in password for User select security tab.
- Provide Basic contact and identification data. NOTE: Email address will be used as User Name when logging in.
- Extension will be generated according to what is numerically the next available extension but can be modified as needed.
- Leave blank until after user has been created.
- Leave blank until number has been selected.
- Leave blank until number has been selected.
Voicemail
Displays all Voicemail's for Current Customer.
