Partner Portal Manual
Choose a chapter
- Introduction
- Quick Start
- Settings
- Main Menu
- Level7 Integration Plugin
2. Quick Start
Log in
To login into the Partner Portal navigate your web browser to https://ssl7.net/partner and follow steps described below.
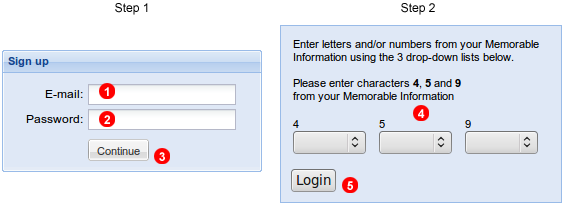
The login process involves two steps. First you need to enter your email address into field (1), password into filed (2) and click Continue button (3). Next you will be asked to enter three random letters from your memorable word. To do it, use three drop down lists (4) to select appropriate characters. Once done, click login button (5).
User Interface overview

- Settings panel - here you can manage all aspects of your branded service such as pricing, connectivity to PSTN gateways etc..
- Main Menu panel - here you can manage all settings related to your Customers.
- Support Centre panel - this panel gives you access to the context sensitive help. Also here you can submit tickets to Level 7 support team.
- Data grid - click on the first column to open context menu. In most cases it consist:
- Edit - select to edit an object
- Notes - view and/or add notes to the object
- History - view all changes ever made to the object
- Customer filter - here you can limit records displayed in a data grid to a specific customer.
- Bottom toolbar - here you can navigate pages with the results and/or perform additional actions.
Initial Setup
Add Web Product
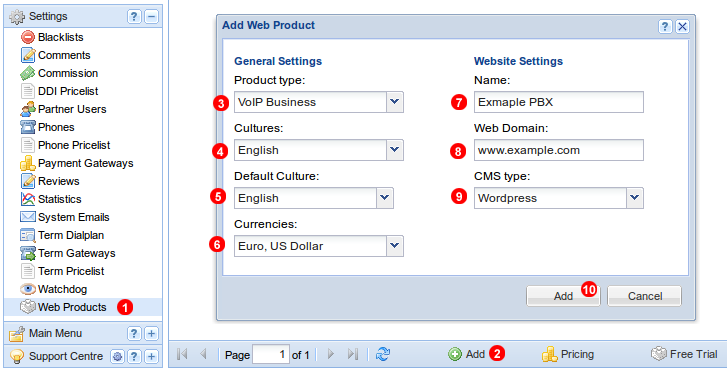
In order to start running your ITSP business, you need to add at least one Web Product (branded website), where your customers can sign up and use various communication services (live support chat, hosted PBX etc). To add a new web product:
- Click
Web Productslink inSettingsmenu. - Click
Addbutton in bottom toolbar. - Select product type:
- Business VoIP (Cloud PBX)
- Residential VoIP
- Live Support Chat
- Choose cultures (languages) you want to use.
- Select default culture (selected in case the platform in unable to detect language automatically).
- Choose currencies you want to use.
- Enter your brand name (it will be used in Manuals, custom softphone, invoices etc.)
- Enter your website domain name.
- Select CMS Type
Wordpress- if you want to integrate your Partner Portal with WordPress site using Level 7 PluginOwn- if you want to manage your website independently from Partner Portal
- Click
Addbutton.
Branded Softphone
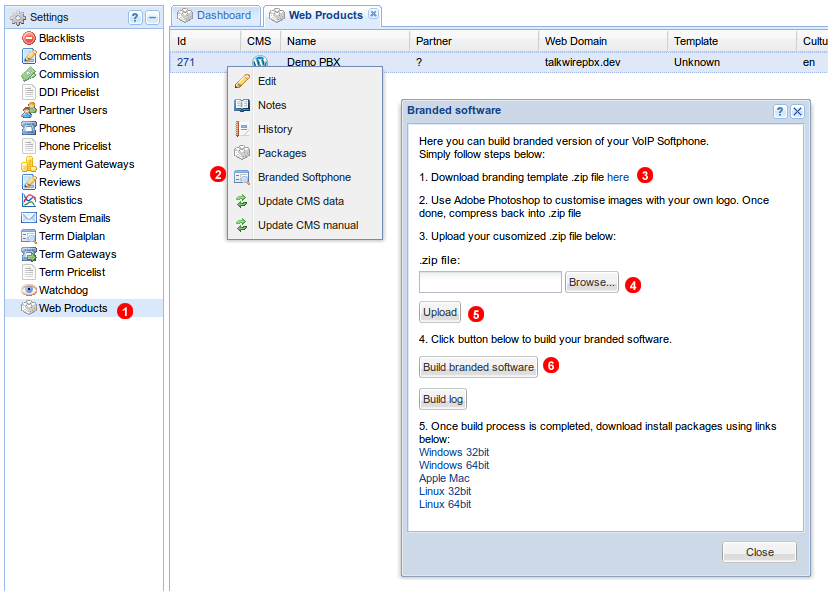
To build your branded softphone:
- Click
Web Productslink inSettingsmenu. - Click ID in the first column and select
Branded Softphonefrom the context menu. - Download branding template .zip file. You will need to use Adobe Photoshop to edit the following files:
aboutWindowBackground.psdsave asaboutWindowBackground.pngsplash.psdsave assplash.gifwix-banner.psdsave aswix-banner.jpgwix-dialog.psdsave aswix-dialog.jpg
- Once you complete your edits compress all files back into .zip file
- Click
Uploadto upload them back to Partner Portal. - Click
Build branded softwarebutton to begin build process. It may take up to 30 minutes to complete. You will receive email notification once process completes.
Set Retail Pricing
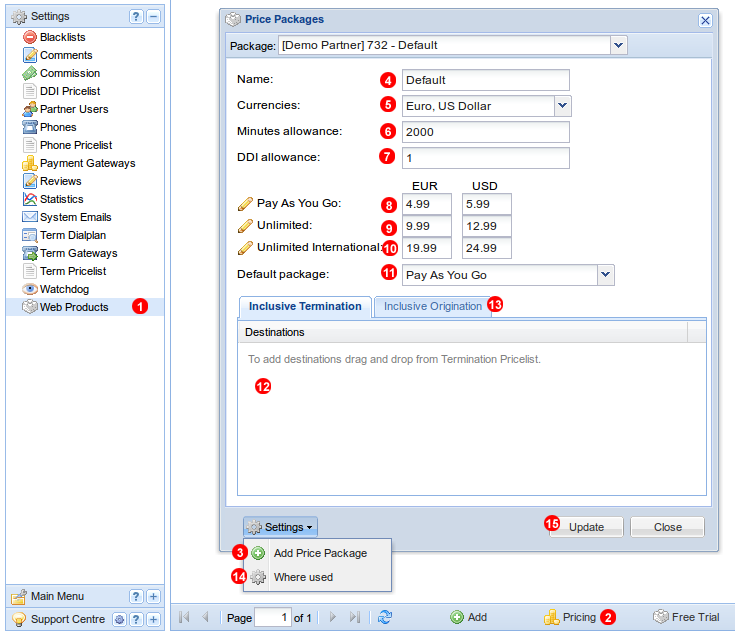
To configure your Retail Pricing (what your customers will be charged for using the service):
- Click
Web Productslink inSettingsmenu. - Click
Pricingbutton in bottom toolbar. - Click
Add Price Packagelink inSettingsmenu. - Enter your Price Package name.
- Enter currencies you want to use in this price package (note: all currencies selected in "Add Web Product" step above has to be selected).
- Enter number of monthly minutes allowance which will be allocated to each user on "Unlimited" package.
- Enter quantity of complimentary DDI numbers which will be allocated to each user on "Unlimited" package.
- Enter price for Pay As You Go (metered) package.
- Enter price for Unlimited Domestic package (call to only one selected country from the list created in step 12 below is allowed free of charge).
- Enter price for Unlimited International package (calls to all countries from the list created in step 12 below are allowed free of charge).
- Select default package.
- Drag and drop records from Termination Pricelist (
Settingsmenu ->Term Pricelist) to create a list of routes where calls are free of charge on Unlimited packages. - Drag and drop records from DDI Pricelist (
Settingsmenu ->DDI Pricelist) to create a list of destinations where DDIs are provided free of charge as part of Unlimited package. - Click
Where usedlink in Settings menu and drag/drop Web Product created in previous step to link this Price package to your Web Product. It is possible to create customized per Customer price packages, and link them to Customers by dragging and dropping fromMain Manu->Customerstable. - Click
Updateto save your settings.
Configure Trial
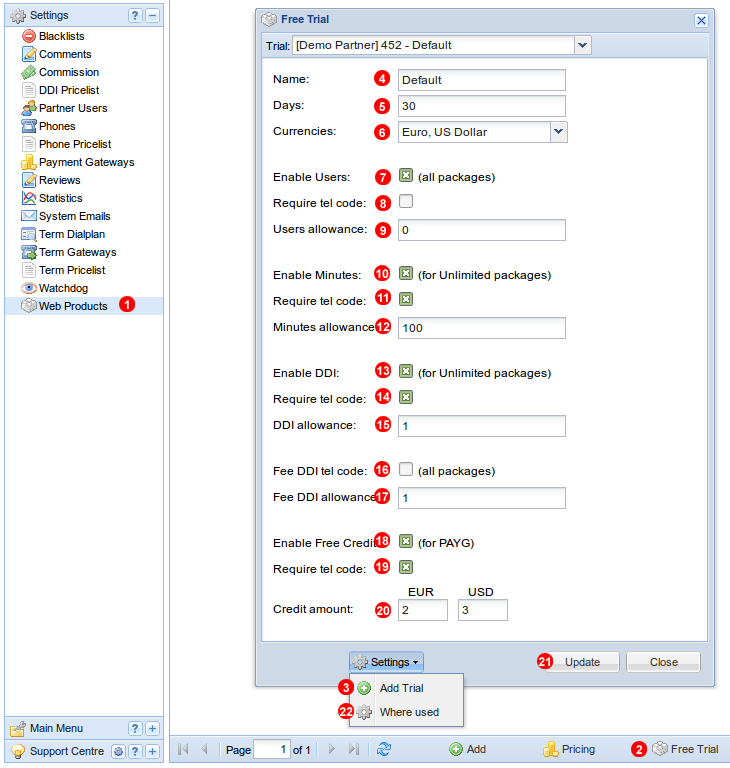
This step is only required if you want to offer Free Trial period to your customers. To configure your Trial parameters:
- Click
Web Productslink inSettingsmenu. - Click
Free Trialbutton in bottom toolbar. - Click
Add Triallink inSettingsmenu. - Enter name of your Trial configuration.
- Enter number of days Free Trial should last since customer registration.
- Select which currencies you want to offer Trial pre-paid credits.
- Select this checkbox to allow additional user (extension) accounts during Free Trial period.
- Require Telephone Trial Activation to allow additional users.
- Enter how many additional user accounts are allowed during Free Trial period (0 is unlimited).
- Select this checkbox to allow free minutes for Unlimited packages.
- Require Telephone Trial Activation to allow free minutes.
- Enter number of free minutes offered during free trial.
- Select this checkbox to allow complimentary DDI number during free trial.
- Require Telephone Trial Activation to allow complimentary DDI.
- Enter quantity of complimentary DDI number allowed for each user.
- Require Telephone Trial Activation to allow Free DDI numbers (MRC and NRC is zero) during Free trial.
- Enter quantity of Free DDI numbers allowed during free trial.
- Select this checkbox to give customer (on PAYG packages) free call out credits during free trial.
- Require Telephone Trial Activation to allow free call out credits.
- Enter amount of free call out credits given.
- Click
Updatebutton to save settings. - Click
Where usedlink inSettingsmenu to link your Trial configuration to Web Product.
Note: further steps below are optional and only required if you opted to use your own Termination and Origination gateways. You will not need to complete them if you choose to use Level 7 supplied DDI and Termination gateway.
Add DDI Gateway
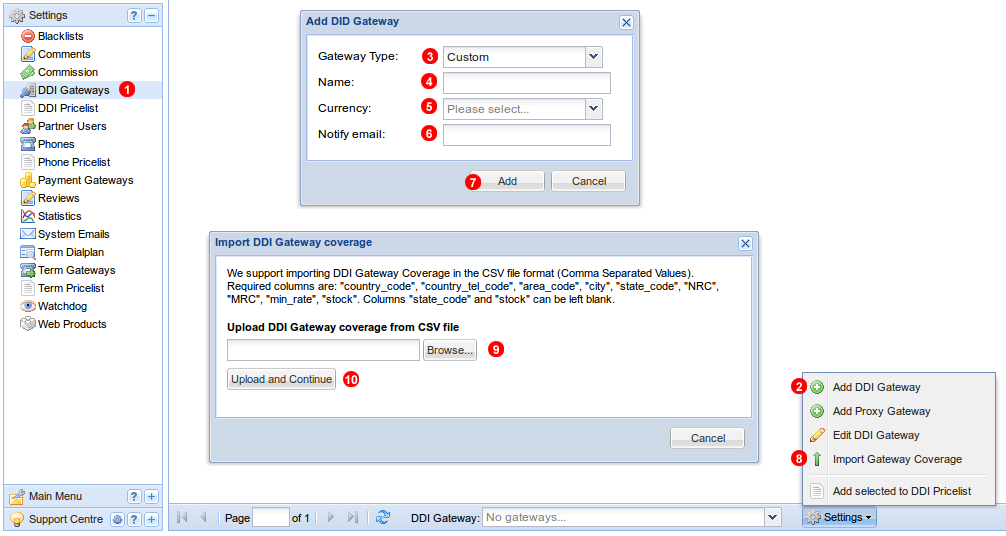
To add DDI Gateway:
- Click
DDI Gatewayslink inSettingsmenu. - Click
Add DDI Gatewaylink in bottom toolbarSettingsmenu. - Select Gateway type.
- Enter Gateway name.
- Select currency used by the gateway supplier.
- Enter email address where any technical notifications related to this gateway should be sent to.
- Click
Addbutton. - Once gateway is created select
Import Gateway Coveragelink in bottom toolbarSettingsmenu. - Select .csv file to upload.
- Click
Upload and Continuebutton.
Add DDI Pricelist
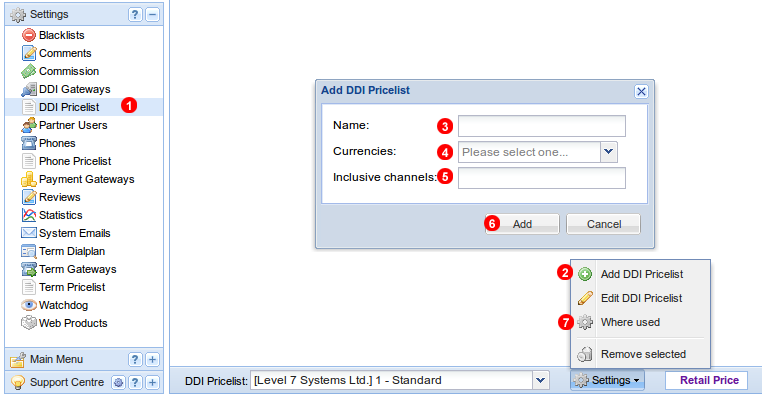
To add DDI Pricelist which will be used to bill your customers for Inbound Numbers and channels:
- Click
DDI Pricelistlink inSettingsmenu. - Click
Add DDI Pricelistlink in bottom toolbarSettingsmenu. - Enter DDI Pricelist name.
- Select currencies this pricelist will use (note: all currencies activated for your Web Product should be selected).
- Enter number of channels which should be included for each number.
- Click
Addbutton. - Click
Where usedlink inSettingsmenu to link your DDI Pricelist to Web Product.
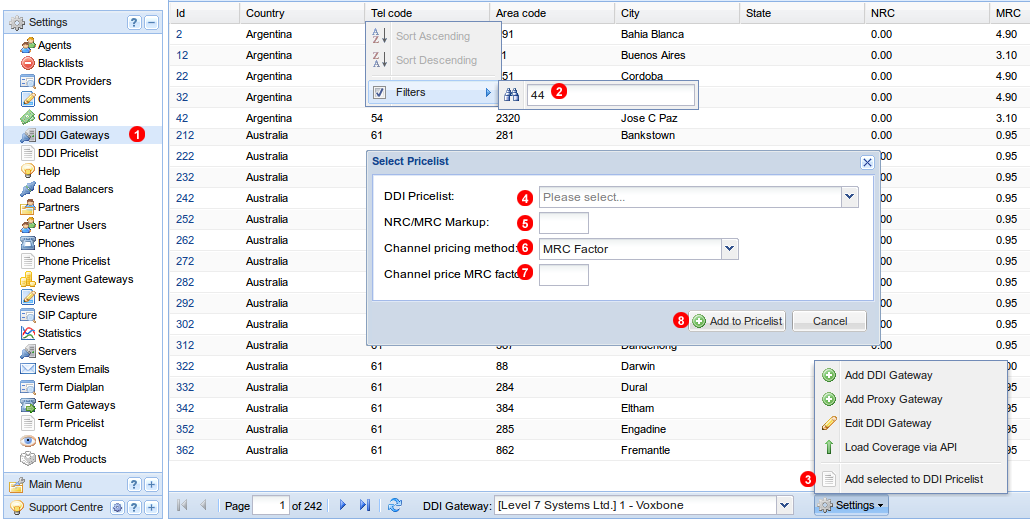
Once DDI Priceslist is created it needs to be populated with records from DDI Gateway coverage.
- Click
DDI Gatewayslink inSettingsmenu. - Optionally you may want to use table filters to add only selected records to DDI Pricelist.
- Click
Add selected to DDI Pricelistlink in bottom toolbarSettingsmenu. - Select DDI Pricelist to which records should be added.
- Enter profit (markup) the billing system should add on top of DDI Gateway (supplier) prices. Entering 1.5 will multiply Gateway (supplier) prices by 1.5 making 50% profit.
- Select method used for channel price:
MRC Factor- Monthly Recurring Charge factor - if you want a channel price to be 50% of number MRC enter 0.5 into field shown as (7)Fixed price- allows to enter per channel price manually
- Enter your channel MRC factor or fixed price depending on setting selected in step 6 above.
- Click
Add to Pricelistbutton.
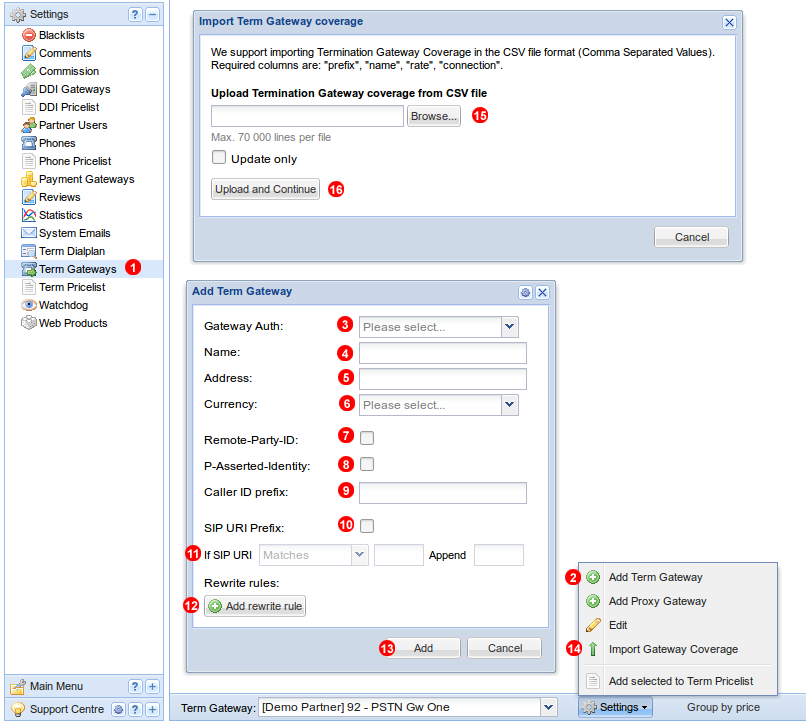
Add Termination Gateway
To add Termination Gateway:
- Click
Term Gatewayslink inSettingsmenu. - Click
Add Term Gatewaylink in bottom toolbarSettingsmenu. - Select Gateway authentication type.
- Enter Gateway name.
- Enter gateway IP address (for IP authentication) or SIP credential (for SIP authentication).
- Select currency used by the gateway supplier.
- Enable if
Remote-Party-IDSIP header is required by the gateway. - Enable if
P-Asserted-IdentifySIP header is required by the gateway. - Enter Caller ID prefix if any required by the gateway.
- Enable if SIP URI requires prefix before E164 numbers (often used for route selection).
- Enter URI prefix rule.
- Enter URI rewrite rules if needed.
- Click
Addbutton. - Once gateway is added select
Import Gateway Coveragefrom theSettingsmenu. - Select .csv file with gateway routes and pricing.
- Click
Upload and Continuebutton.
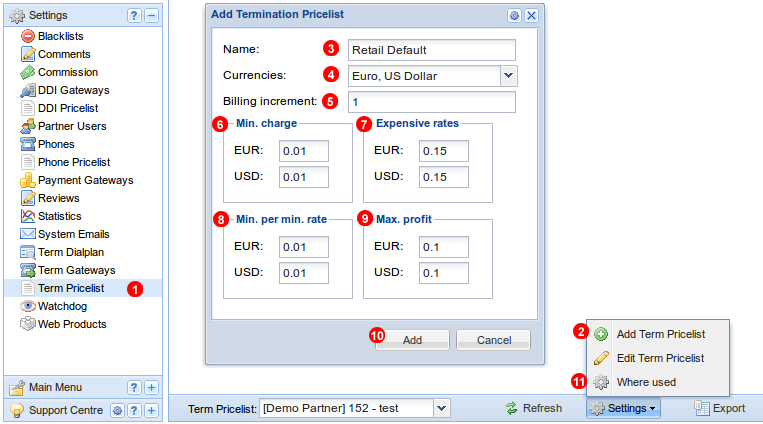
Add Termination Pricelist
To add Termination Pricelist which will be used to bill your customers for outbound calls:
- Click
Term Pricelistlink inSettingsmenu. - Click
Add Term Pricelistlink in bottom toolbarSettingsmenu. - Enter Termination Pricelist name.
- Select currencies this pricelist will use (note: all currencies activated for your Web Product should be selected).
- Enter billing increment (in seconds) for this pricelist.
- Enter minimum per minute charge for this pricelist. It is the minimum amount the billing system will charge for a call. For example for 5 seconds long call to France with per minute rate of 0.01 USD the calculated charge will be:
5 seconds / 60 seconds x 0.01 USD = 0.000833withMin. chargeset to 0.01 this would be rounded up to 0.01 USD - Enter per minute rate for calls to be considered "expensive". By default new customer account will not be able to dial "expensive" destinations (unless this feature is disabled on their account).
- Enter minimum per minute rate used in this pricelist. It will be used in the next step below when populating Termination Pricelist with data from Term Gateway. The system will automatically add configured markup, however if the gateway (supplier) price with markup added is below
Min. per min. rateit will be automatically rounded up to this value. - Enter maximum profit value which will be used in the next step below when populating Termination Pricelist with data from Term Gateway. The system will automatically add configured markup, however if the markup added is above
Max. profitit will be automatically reduced to value entered in this field. - Click
Addbutton. - Click
Where usedlink inSettingsmenu to link your Termination Pricelist to Web Product.
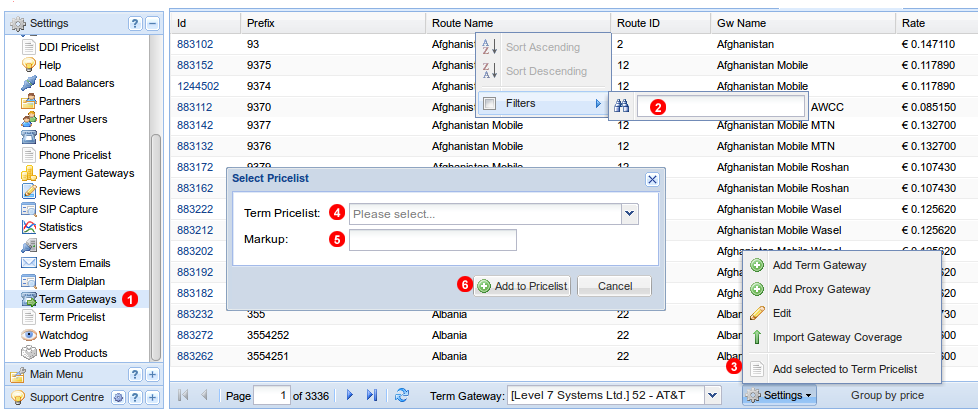
Once Termination Priceslist is created it needs to be populated with records from Term Gateway coverage.
- Click
Term Gatewayslink inSettingsmenu. - Optionally you may want to use table filters to add only selected records to Term Pricelist.
- Click
Add selected to Term Pricelistlink in bottom toolbarSettingsmenu. - Select Term Pricelist to which records should be added.
- Enter profit (markup) the billing system should add on top of Termination Gateway (supplier) prices. Entering 1.5 will multiply Gateway (supplier) prices by 1.5 making 50% profit.
- Click
Add to Pricelistbutton.
Going live
Once you are satisfied with the look and content of your website, you can switch from development to live mode. To do so, please submit a ticket via Support Center and request activation of your Web Product. From now on your Customers will be able to sign up, enjoy their free trial period after which our automated billing system will start charging retail prices as defined in your Web Product settings.